

1. 컨스트레인트 레이아웃 ConstraintLayout
한 화면을 구성하는 뷰들에 서로 제약을 주는 레이아웃. 컨스트레인트 레이아웃을 자주 쓰는 가장 큰 이유는 '다양한 화면 크기에 대응하는 반응형 UI를 쉽게 구성'할 수 있기 때문. 또 중첩된 레이아웃을 사용하지 않고도 크고 복잡한 레이아웃을 만들 수 있어 성능면에서 유리함
1) 기본 속성
👾 컨스트레인트 레이아웃에서 자식 뷰의 위치를 정의하려면 자식 뷰의 수직 / 수평 방향에 제약 조건을 각각 하나 이상 추가
👾 자식 뷰에 아무런 제약도 추가하지 않으면 왼쪽 상단에 배치. 컨스트레인트 레이아웃에서 자주 쓰는 속성은 다음과 같음.
app:layout_constraint[내 방향]_to[기준 뷰 방향]Of = "[기준 뷰 ID or parent]"
✓ [내 방향]을 [기준 뷰 방향]에 맞추고 그 기준 뷰가 무엇인지 알려줌
예제
<androidx.constraintlayout.widget.ConstraintLayout xmlns:android="http://schemas.android.com/apk/res/android"
    xmlns:app="http://schemas.android.com/apk/res-auto"
    android:layout_width="match_parent"
    android:layout_height="match_parent">

    <Button
        android:id="@+id/button_1"
        android:layout_width="wrap_content"
        android:layout_height="wrap_content"

        // 시작 부분을 부모의 시작부분에 맞춤
        app:layout_constraintStart_toStartOf="parent"
        android:layout_marginStart="32dp"
        // 윗면을 부모의 윗면에 맞춤
        app:layout_constraintTop_toTopOf="parent"
        android:layout_marginTop="100dp"

        android:text="Button 1" />

    <TextView
        android:layout_width="wrap_content"
        android:layout_height="wrap_content"

        // 시작부분을 버튼 끝부분에 맞춤
        app:layout_constraintStart_toEndOf="@+id/button_1"
        // 밑부분을 버튼부분에 맞춤
        app:layout_constraintBottom_toBottomOf="@+id/button_1"
        // 윗부분을 버튼 윗부분과 맞춤
        app:layout_constraintTop_toTopOf="@+id/button_1"
        android:layout_marginStart="32dp"
        android:text="버튼을 클릭해주세요!" />


</androidx.constraintlayout.widget.ConstraintLayout>
2) 컨스트레인트 레이아웃에서 마진을 줄 때 주의점
👾 자식 뷰 사이에 여백을 정해줄 때 레이아웃에서는 layout_margin 속성을 사용
👾 리니어 레이아웃과 상대적 레이아웃에서는 별다른 고려 없이 사용해도 되지만, 컨스트레인드 레이아웃을 사용할 때는 반드시 해당 방향으로 제약이 존재해야 마진값이 적용되는 규칙이 있음
예를 들면 위쪽 방향으로 여백을 100dp 만큼 주고 싶을 경우, 위쪽 방향에 제약이 없는 상태에서 android:layout_marginTop = "100dp"를 하면 적용이 되지 않음. 그러므로 반드시 android:layout_constraintTop_toTopOf="parent"와 같은 위쪽 방향에 제약을 추가할 수 있는 속성을 추가해야 함.
3) match_constaint 속성
컨스트레인트 레이아웃을 이용해 앱의 레이아웃을 구성하다 보면 layout_width와 layout_height 속성에서 빈번하게 0dp 값을 보게 됨
그 뷰의 너비나 높이가 0dp라는 것은 match_constraint와 같음. match_parent가 부모 레이아웃 크기에 뷰 크기를 맞춘다는 것이라
면 match_constraint는 제약에 뷰 크기를 맞춤.
<androidx.constraintlayout.widget.ConstraintLayout xmlns:android="http://schemas.android.com/apk/res/android"
android:layout_width="match_parent"
android:layout_height="match_parent"
xmlns:app="http://schemas.android.com/apk/res-auto">
<Button
android:id="@+id/button_1"
android:layout_width="wrap_content"
android:layout_height="wrap_content"
app:layout_constraintStart_toStartOf="parent"
app:layout_constraintTop_toTopOf="parent"
android:layout_marginTop="100dp"
android:text="Button 1" />
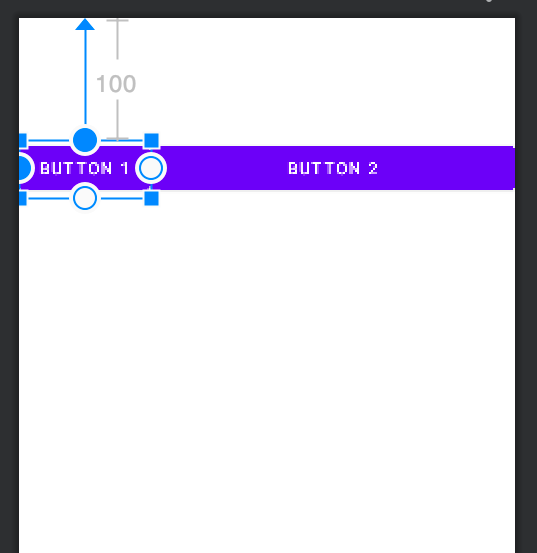
<Button
android:id="@+id/button_2"
android:layout_width="0dp"
android:layout_height="wrap_content"
app:layout_constraintStart_toEndOf="@+id/button_1"
app:layout_constraintEnd_toEndOf="parent"
app:layout_constraintTop_toTopOf="@+id/button_1"
android:text="Button 2" />
</androidx.constraintlayout.widget.ConstraintLayout>
✓ [Button 2]의 너비가 제약에 맞춰짐. [Button 1]의 끝점과 부모 레이아웃의 끝점만큼의 크기를 차지
[ 내용 참고 : IT 학원 강의 ]
'Android Studio' 카테고리의 다른 글
| [Android Studio] 메인 스레드와 백그라운드 스레드 · 스톱워치 구현 (1) | 2024.05.30 |
|---|---|
| [Android Studio] 반응형 UI 만들기 (0) | 2024.05.30 |
| [Android Studio] 맵 클러스터링 (0) | 2024.05.28 |
| [Android Studio] 서울 공공도서관 앱 개발하기 (0) | 2024.05.26 |
| [Android Studio] 레트로핏 데이터 통신 라이브러리 (0) | 2024.05.26 |