1. 텍스트뷰
텍스트뷰는 View 클래스 바로 다음에 위치하며 다양한 위젯이 그 하위에 존재
텍스트뷰의 하위(에디트텍스트, 버튼, 체크박스 등)는 모두 텍스트뷰로부터 상속받는다.
| 속성 | 설명 |
| text | 텍스트뷰에 나타나는 문자열을 표현 '문자열'형식으로 값을 직접 입력하거나 '@string/변수이름'형식으로 설정한 후 strings.xml 파일에 지정할 수 있음 |
| textColor | 글자의 색상을 지정 |
| textSize | 글자의 크기를 dp, px, in, mm, sp 단위로 지정 |
| typeface | 글자의 글꼴을 지정. 값으로 sans, serif, monospace를 설정할 수 있고 디폴트는 normal |
| textStyle | 글자의 스타일을 지정. 값으로 bold, italic, bold|italic을 설정할 수 있고 디폴트는 normal |
| singleLine | 글이 길어 줄이 넘어갈 경우 강제로 한 줄만 출력하고 문자열의 맨 뒤에 '...'를 표시 값으로 true와 false를 설정할 수 있고 디폴트는 false |
    <TextView
        android:layout_width="wrap_content"
        android:layout_height="wrap_content"
        android:text="textSize 속성"
        android:textSize="30dp" />

    <TextView
        android:layout_width="wrap_content"
        android:layout_height="wrap_content"
        android:text="textColor 속성"
        android:textColor="#00FF00"
        android:textSize="30dp" />

    <TextView
        android:layout_width="wrap_content"
        android:layout_height="wrap_content"
        android:text="textStyle 속성"
        android:textSize="30dp"
        android:textStyle="bold|italic" />

    <TextView
        android:layout_width="wrap_content"
        android:layout_height="wrap_content"
        android:text="typeface 속성"
        android:textSize="30dp"
        android:typeface="serif" />

    <TextView
        android:layout_width="wrap_content"
        android:layout_height="wrap_content"
        android:singleLine="true"
        android:text="singleLine 속성 singleLine 속성 singleLine 속성"
        android:textSize="30dp" />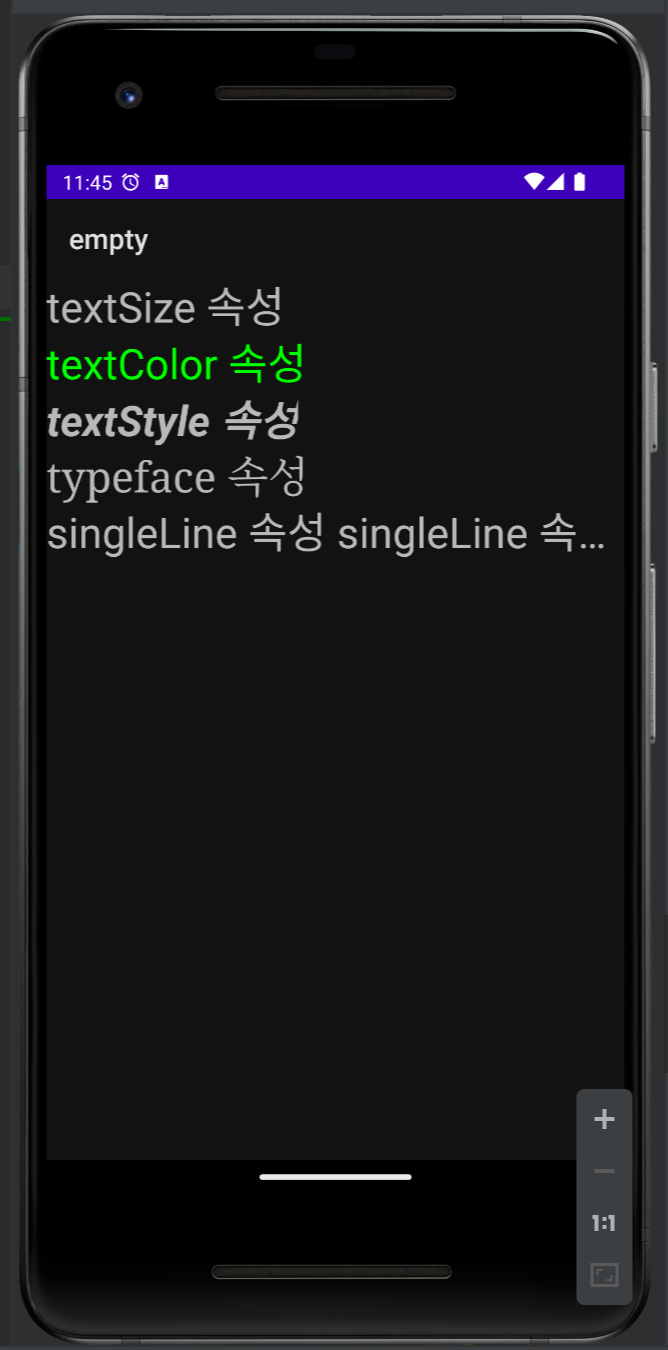
Kotlin 코드로 XML 속성 설정
activity_main.xml파일에서 지정한 XML 속성을 Kotlin 코드에서도 설정 가능.
기본적인 텍스트뷰만 만들어 놓고 id속성과 text만 설정한 XML파일.
class MainActivity : AppCompatActivity() {
    override fun onCreate(savedInstanceState: Bundle?) {
        super.onCreate(savedInstanceState)

        val textView1 = findViewById<TextView>(R.id.textView1)
        val textView2 = findViewById<TextView>(R.id.textView2)
        val textView3 = findViewById<TextView>(R.id.textView3)

        textView1.text = "안녕하세요?"
        textView1.setTextColor(Color.RED)
        textView2.textSize = 30.0f
        textView2.setTypeface(Typeface.SERIF, Typeface.BOLD_ITALIC)
        textView3.text = "가나다라마바사아자차카타파하가나다라마바사아자차카타파하가나다라마바사아자차카타파하가나다라마바사아자차카타파하"
        textView3.isSingleLine = true
    }
}
- textView1.setText("안녕하세요?") : 첫 번째 텍스트뷰의 문자열을 변경
- textView1.setTextColor(Color.RED) : 첫 번째 텍스트뷰의 색상을 빨간색으로 지정. 색상은 android.graphics.Color 클래스에 상수로 지정
- textView2.setTextSize(30.0f) : 두 번째 텍스트뷰에 sp 단위의 폰트 크기를 지정 (XML 속성의 textSize="30sp"와 동일한 역할)
- textView2.setTypeface(Typeface.SERIF, Typeface.BOLD_ITALIC) : 두 번째 텍스트뷰에 XML속성의 typeface와 textStyle 속성을 동시에 지정하는 메서드 (android.graphics.Typeface 클래스에 상수로 지정)
- textView3.setText("가나다라마바사아자차카타파하가나다라마바사아자차카타파하")
- textView3.setSingleLine() : 세 번째 텍스트뷰에 긴 글을 대입하고 XML 속성에서 singleLine="true" 효과를 줌
💫 XML 파일에서 설정하는 내용의 대부분이 메서드로 제공되어 Kotlin 코드에서 XML 설정이 가능
2. 버튼과 에디트텍스트
버튼과 에디트텍스트는 사용자에게서 어떤 값을 입력받기 위한 가장 기본적인 위젯으로 활용도가 높음.
두 위젯은 View 클래스와 TextView 클래스를 상속받으므로 거의 비슷하게 사용할 수 있음.
1) 버튼
버튼에서는 버튼을 클릭하는 이벤트
일반적인 버튼의 XML 코드
A. 버튼 변수 선언 val myButton :Button
B. 변수에 버튼 위젯 대입 myButton = findViewById<Button>(R.id.button1);
C. 버튼을 클릭할 때 동작하는 클래스 정의
myButton.setOnClickListener {
// 동작 내용을 이 부분에 코딩
}
✓ 위의 세 단계는 대부분의 위젯(라디오버튼, 이미지버튼, 체크박스, 토글버튼 등)에서 거의 동일하게 사용
checkbox
 <CheckBox
        android:id="@+id/android"
        android:layout_width="match_parent"
        android:layout_height="wrap_content"
        android:checked="true"
        android:text="안드로이드폰" />

    <CheckBox
        android:id="@+id/iphone"
        android:layout_width="match_parent"
        android:layout_height="wrap_content"
        android:text="아이폰" />

    <CheckBox
        android:id="@+id/window"
        android:layout_width="match_parent"
        android:layout_height="wrap_content"
        android:checked="true"
        android:text="윈도우폰" />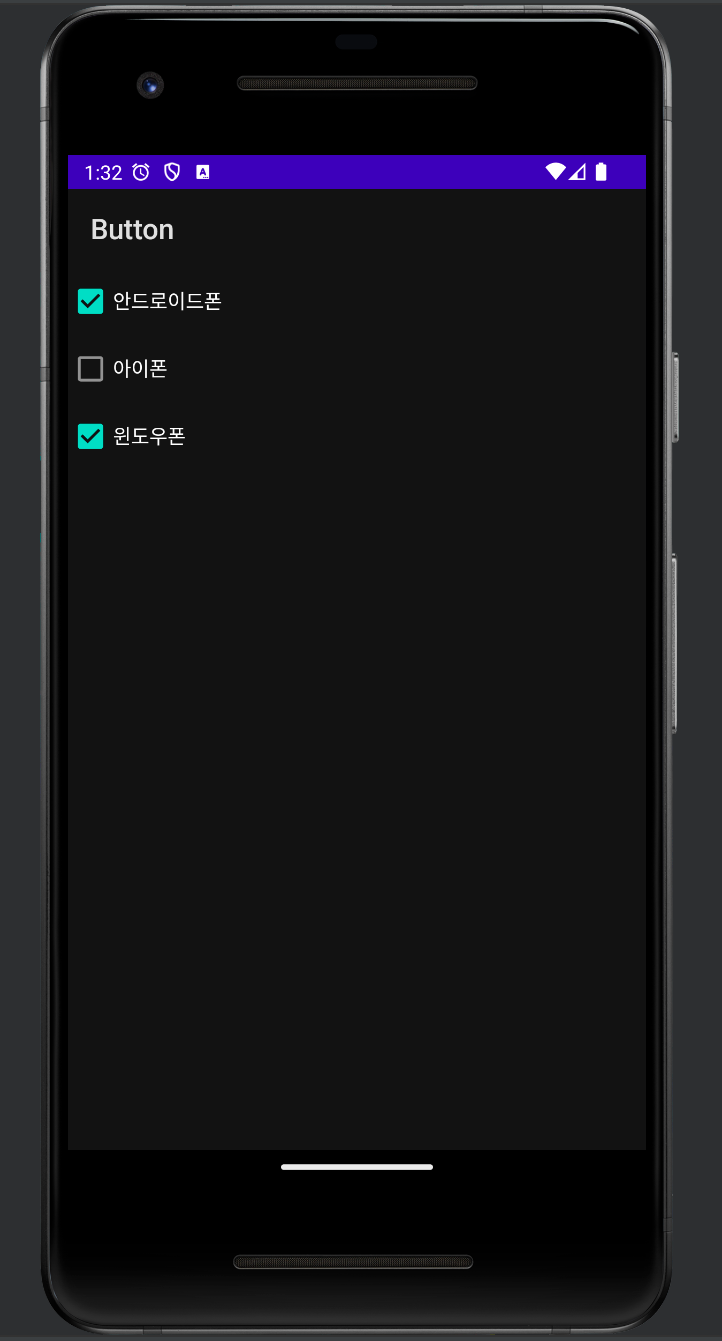
radio button
    <RadioGroup
        android:id="@+id/rGroup1"
        android:layout_width="wrap_content"
        android:layout_height="wrap_content">

        <RadioButton
            android:id="@+id/radio0"
            android:layout_width="wrap_content"
            android:layout_height="wrap_content"
            android:checked="true"
            android:text="남성" />

        <RadioButton
            android:id="@+id/radio1"
            android:layout_width="wrap_content"
            android:layout_height="wrap_content"
            android:text="여성" />
    </RadioGroup>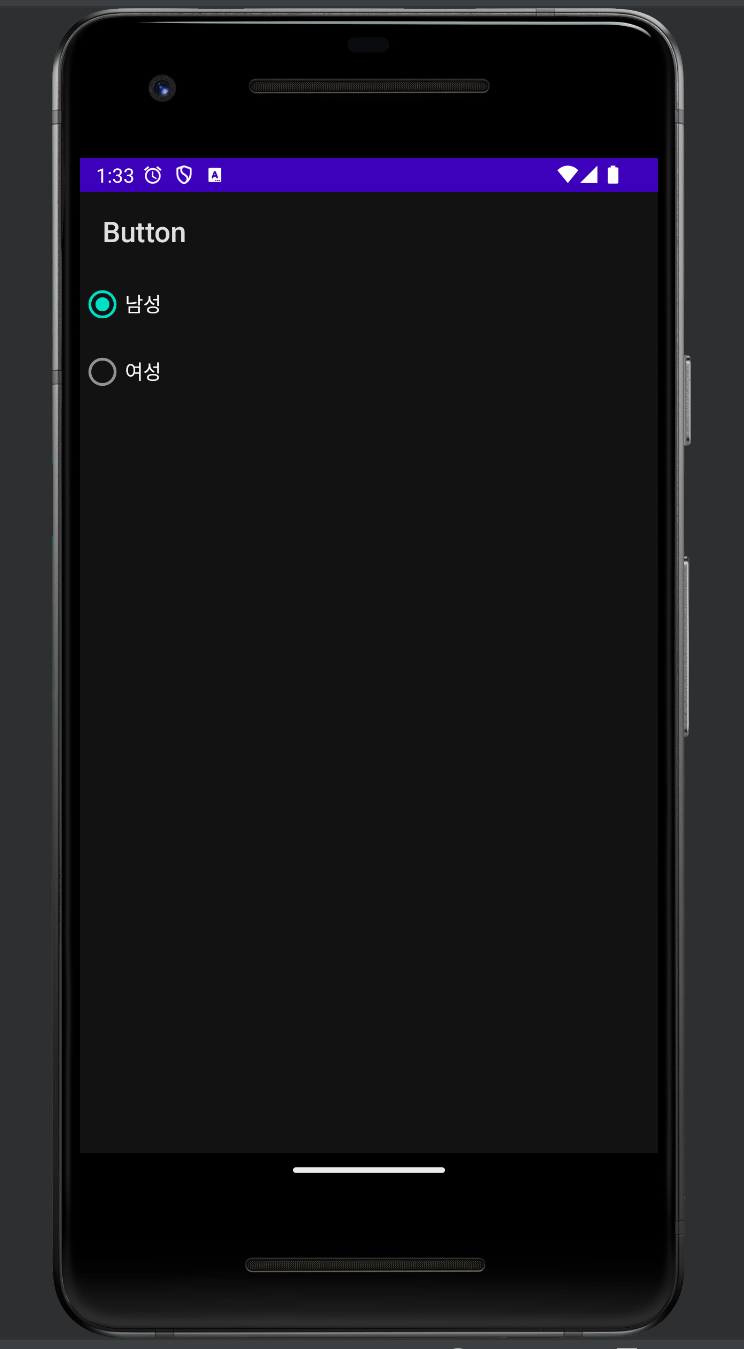
switch & togglebutton
 <Switch
        android:layout_width="wrap_content"
        android:layout_height="wrap_content"
        android:checked="true" />

    <Switch
        android:layout_width="wrap_content"
        android:layout_height="wrap_content"
        android:checked="false" />

    <ToggleButton
        android:layout_width="wrap_content"
        android:layout_height="wrap_content"
        android:checked="true" />

    <ToggleButton
        android:layout_width="wrap_content"
        android:layout_height="wrap_content"
        android:checked="false" />
2) 에디트텍스트
에디트텍스트는 값을 입력받은 후 해당 값을 Java 코드에서 가져와 사용하는 용도로 많이 쓰임
에디트텍스트도 변수를 선언하고 이 변수에 해당 아이디 값을 넣은 후에 접근
XML 코드
A. 에디트텍스트 변수 선언 var myEdit :EditText
B. 변수에 에디트텍스트 위젯 대입 myEdit = findViewById<TextEdit>(R.id.edittext1);
C. 에디트텍스트에 입력된 값 가져오기 ( 주로 버튼 클릭 이벤트 리스너 안에 삽입 )
var myStr : String = myEdit.getText().toString();
✓ getText() 메서드는 에디트텍스트에 입력한 값을 반환. 이를 문자열로 바꾸기 위해 toString()을 사용
반환값을 문자열로 변경할 때 가장 많이 사용하는 방식
    <TextView
        android:layout_width="match_parent"
        android:layout_height="wrap_content"
        android:text="아래에 이름을 입력 :"
        android:layout_margin="20dp"/>

    <EditText
        android:layout_width="match_parent"
        android:layout_height="wrap_content"
        android:hint="여기에 채우세요"
        android:layout_margin="20dp"/>

    <Button
        android:id="@+id/button1"
        android:layout_width="match_parent"
        android:layout_height="wrap_content"
        android:text="확인"
        android:layout_margin="20dp"/>
[ 내용 참고 : IT 학원 강의 ]
'Android Studio' 카테고리의 다른 글
| [Android Studio] 파일 처리 | openFileInput() & openFileOutput() & openRawResource() (0) | 2024.05.01 |
|---|---|
| [Android Studio] 날씨와 시간 위젯 | 자동완성 텍스트뷰 위젯 | 진행상태 표시 위젯 (0) | 2024.04.29 |
| [Android Studio] 테이블 레이아웃, 그리드 레이아웃, 프레임 레이아웃 (1) | 2024.04.25 |
| [Android Studio] relative layout (0) | 2024.04.25 |
| [Android Studio] Layout 개념과 종류, 리니어 레이아웃과 중첩 리니어 레이아웃 (0) | 2024.04.23 |